How to Break In a New Home Sauna Before First Use
Breaking in a new home sauna is the single most important step you can take to protect your investment and your health. Fresh wood, new heating elements, and unseasoned seals all release volatile compounds during the first few heat cycles, and a proper break-in routine drives those fumes out before you ever sit inside. Done right, the process also stabilizes the wood, prevents warping, and sets the stage for years of safe, comfortable sessions.
Why a Break-In Routine Matters
Every sauna, whether it is a traditional wood-fired cabin or a modern low-EMF infrared unit, contains materials that have never been exposed to high heat. The wood may still hold residual moisture and natural resins, the heater may have a thin film of manufacturing oil, and the door seals and adhesives may outgas when warmed. Without a controlled break-in, those substances can fill the small, enclosed space and create unpleasant odors, eye irritation, or respiratory discomfort during your first real session.
The break-in process is not just about comfort. Rapid, uneven heating of fresh wood can cause boards to cup, crack, or pull away from their fasteners. A gradual warm-up allows the wood to expand and contract slowly, settling into its final shape without stress. It also gives you a chance to test the heater, thermostat, and ventilation before you rely on them for a full therapeutic session.
The Science of Outgassing and Wood Conditioning
When you heat a new sauna for the first time, you are essentially baking the interior. Volatile organic compounds (VOCs) trapped in the wood, paint, sealants, and insulation become more mobile as temperature rises and are released into the air. This is why the first few heat cycles often produce a strong ‘new sauna’ smell. By running the sauna empty and airing it out between cycles, you purge most of those VOCs before your first session.
Wood also undergoes physical changes. As moisture evaporates, the wood fibers shrink slightly. If the temperature rises too quickly, the outer surface dries and contracts faster than the inner core, which can lead to surface checking or small cracks. A slow, staged break-in allows moisture to leave the wood evenly, minimizing stress and preserving the smooth, clean look of the interior.
Step-by-Step Break-In Procedure
Every sauna manufacturer provides a recommended break-in procedure, and you should always follow that first. The steps below are a general guide based on common practice for both traditional and infrared saunas. If your manual specifies different temperatures, times, or ventilation steps, defer to the manual.
Before You Start
- Read the owner manual cover to cover. Look for any specific break-in instructions, temperature limits, or warnings about first use.
- Ensure the sauna is installed on a level, stable surface and that all electrical connections are complete and inspected by a qualified electrician if required.
- Remove any loose debris, sawdust, or packaging materials from the interior. Wipe down the benches and walls with a dry, soft cloth.
- Open all vents, windows, or doors to the outside if possible. Good airflow is essential during the first few cycles.
- Check that the heater is securely mounted and that no flammable materials are near the heating elements.
First Heat Cycle: Low and Slow
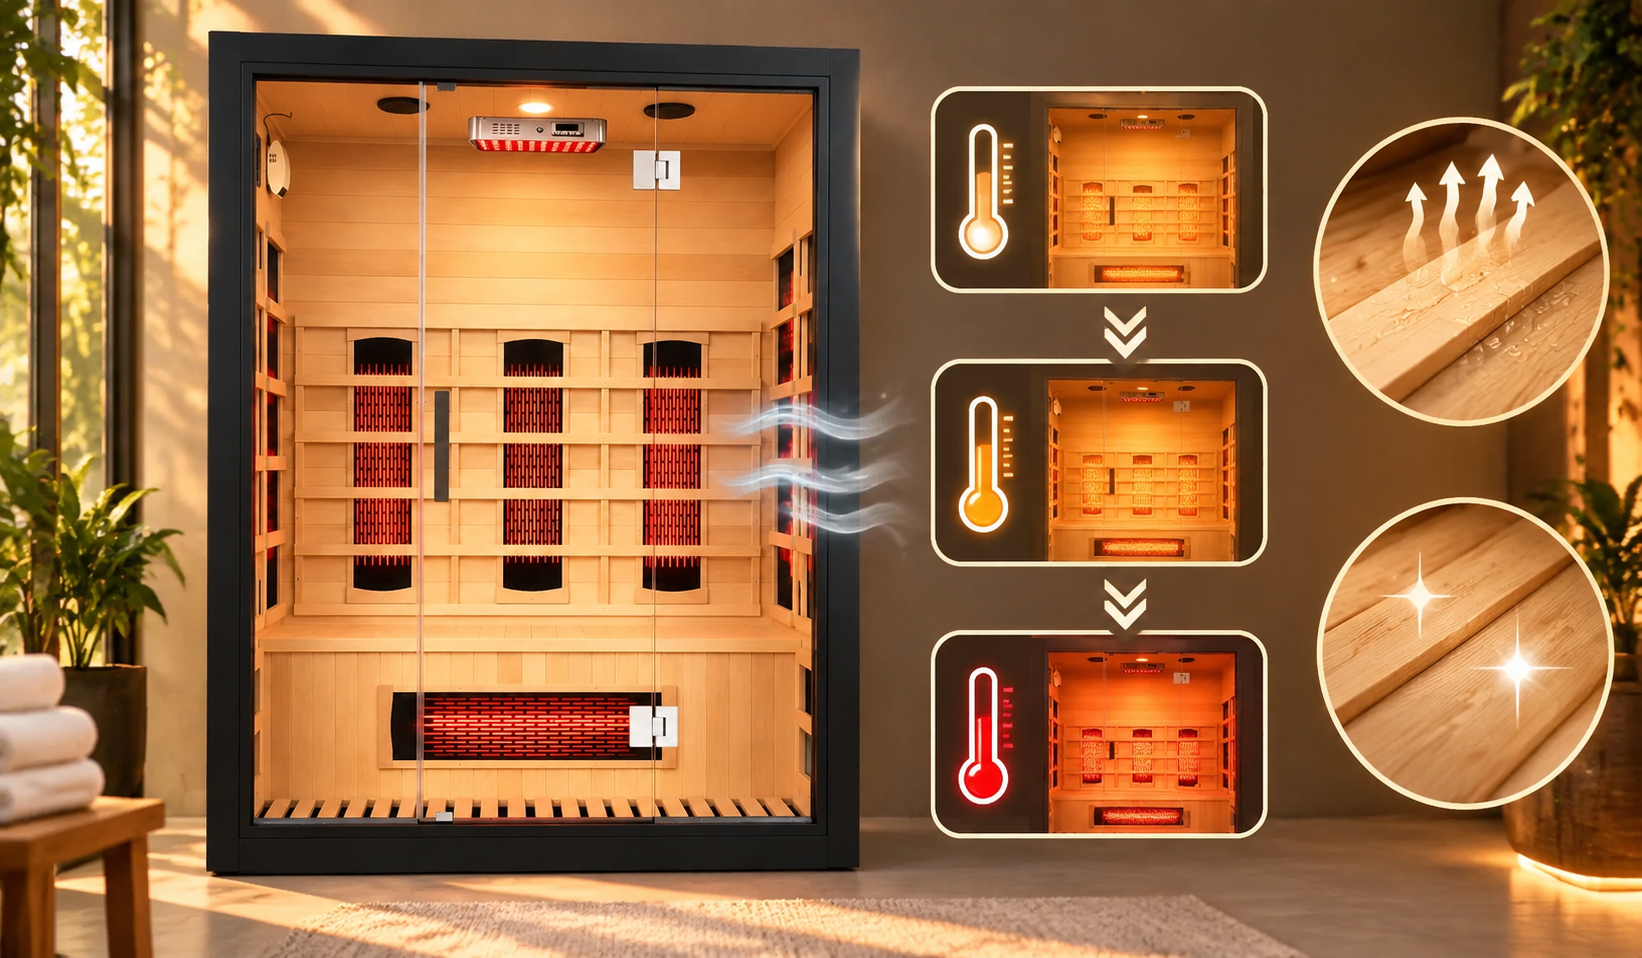
- Set the sauna temperature to its lowest setting, or around 110–120°F (43–49°C) for infrared saunas. For traditional saunas, build a small fire and let the room warm gradually.
- Run the sauna empty for 30–60 minutes. Do not sit inside during this cycle.
- After the time is up, turn off the heater and open the sauna door fully. Allow the interior to cool and air out for at least 30 minutes. You may also use a fan to speed ventilation.
- Wipe down any visible moisture or residue from the benches and walls with a clean, dry cloth.
Second Heat Cycle: Moderate Temperature
- Set the sauna to a moderate temperature, around 140–150°F (60–66°C). For a traditional sauna, add more wood and let the room climb slowly.
- Run the sauna empty for another 45–60 minutes.
- Turn off the heater, open the door, and air out the room for at least 30 minutes. Wipe down surfaces again.
Third Heat Cycle: Full Operating Temperature
- Set the sauna to your desired operating temperature, typically 150–170°F (66–77°C) for infrared or 170–190°F (77–88°C) for traditional.
- Run the sauna empty for 45–60 minutes. This final cycle should drive off any remaining VOCs and condition the wood to its working temperature.
- Turn off the heater, open the door, and let the sauna cool completely. Wipe down all interior surfaces one last time.
After three cycles, your sauna should be ready for use. You may still notice a faint wood scent for the first few sessions, but it should be pleasant and mild, not sharp or chemical. If strong odors persist, run one or two more empty cycles before using the sauna.
Proper break-in is not a suggestion; it is a critical step that protects both the sauna structure and the health of everyone who uses it.
Practical Safety Checklist for Break-In Week
- Never leave a sauna unattended during a break-in cycle. Stay nearby and check the temperature and any unusual smells every 15–20 minutes.
- Keep a fire extinguisher rated for electrical fires within easy reach if you have an electric sauna, or a bucket of sand for a wood-fired unit.
- Do not pour water on the rocks during the break-in cycles. Wait until the sauna is fully broken in and you are using it normally.
- If you smell burning plastic, see smoke, or hear unusual electrical noises, shut off the power immediately and consult a licensed electrician or the manufacturer.
How It Works: Electrical and Thermal Considerations
In an infrared sauna, the heating elements are usually carbon or ceramic panels that emit infrared radiation. These panels have a thin protective coating that can outgas when first heated. Running the sauna empty allows that coating to cure without exposing you to the fumes. In a traditional sauna, the stove itself should be burned off outdoors or in a well-ventilated area before installation, as the high-temperature paint on the stove body releases fumes during its first firing.
The thermal expansion of the wood is another key factor. Most sauna interiors are made from softwoods like cedar or hemlock, which have a relatively high coefficient of thermal expansion. A gradual break-in lets the wood adjust to the heat without developing stress cracks or gaps at the joints.
Common Mistakes to Avoid
One of the most common mistakes is skipping the break-in entirely because the sauna ‘looks fine.’ Even if there is no visible defect, the first heat cycle will release fumes that you do not want to breathe. Another mistake is running the sauna at full temperature right away. This can shock the wood and cause warping or cracking, especially in dry climates.
Some owners also forget to air out the sauna between cycles. Without ventilation, the VOCs released during the first cycle simply settle back onto the surfaces and re-release during the next cycle. Opening the door and using a fan is essential to purge the air completely.
Video walkthrough: breaking in a freshly built sauna step by step
This on-camera walkthrough shows the break-in process for a newly built wood-fired sauna. The presenter starts by emphasizing that the stove and chimney should already be burned off outdoors before the sauna is finished, so that paint fumes do not contaminate the interior. He then lights a fire in the stove, fills the water tank, and lets the room heat up for about half an hour with the door closed. When the temperature reaches 160°F, he opens the door and leaves it open for a few minutes to air out the room, describing this as the first of several heating and airing cycles. The key takeaway is that a gradual, staged break-in with proper ventilation helps condition the fresh wood and prevents damage from rapid heating.
Closing Summary: Break-In as a Foundation for Safe Use
A proper break-in routine is the foundation of a safe and long-lasting home sauna. By taking the time to run three controlled heat cycles and air out the room between each one, you protect the wood, the heater, and your own respiratory health. After the break-in, continue to follow the manufacturer’s maintenance schedule for cleaning, wood care, and heater inspection. This article is for informational purposes only and does not constitute professional maintenance advice. Always consult your owner manual and, for any electrical or structural concerns, contact a licensed electrician or qualified technician.
Frequently Asked Questions
1. How long does a sauna break-in take?
A typical break-in takes three heat cycles of 45–60 minutes each, plus cooling and airing time between cycles. Plan for a full afternoon or evening to complete the process properly. Do not rush the cycles, as gradual heating is essential for wood conditioning.
2. Can I sit in the sauna during the break-in cycles?
No. The break-in cycles are meant to run empty so that fumes and VOCs are released without anyone breathing them. Wait until all recommended cycles are complete and the sauna has been aired out before your first session.
3. What temperature should I use for the first break-in cycle?
Start low, around 110–120°F (43–49°C) for infrared saunas or a small fire for traditional saunas. The goal is to warm the wood gently without shocking it. Increase the temperature gradually over the next two cycles.
4. My sauna has a strong chemical smell after break-in. Is that normal?
A mild wood scent is normal, but a strong chemical or plastic smell is not. If the odor persists after three full cycles, run one or two more empty cycles with the door open. If it still smells, contact the manufacturer for guidance.
5. Do I need to break in an infrared sauna differently than a traditional sauna?
The principle is the same: gradual heating and airing out. Infrared saunas typically have lower maximum temperatures, so the break-in temperatures will be lower. Always follow the specific instructions in your owner manual.
6. Can I use the sauna while it is still warm from a break-in cycle?
No. Let the sauna cool completely and air out before using it. The break-in cycles are for conditioning, not for therapy. Using the sauna too soon can expose you to residual fumes and defeat the purpose of the process.
7. How often should I repeat the break-in process?
You only need to break in a sauna once, when it is new. However, if you replace the heater, refinish the wood, or make major repairs, you should run a shortened break-in cycle to condition the new materials.
8. What should I do if I see smoke during the first heat cycle?
A small amount of smoke or odor from manufacturing oils is normal, especially with a new heater. If you see visible smoke or flames, shut off the power immediately and inspect the heater. If you are unsure, contact a licensed electrician.
9. Can I break in my sauna in cold weather?
Yes, but the process may take longer because the sauna will lose heat more quickly when you open the door to air it out. You may need to run slightly longer cycles or add an extra cycle to fully condition the wood.
10. Is it safe to leave the sauna unattended during break-in?
No. You should stay nearby and check the sauna every 15–20 minutes during each cycle. This allows you to catch any unusual smells, sounds, or temperature spikes before they become a problem.
For more on low-EMF home infrared saunas and the models we offer, visit yardsauna.com.
This article is for informational purposes only and does not constitute professional maintenance advice. Always follow the manufacturer instructions, consult a licensed electrician or qualified technician for any electrical or structural work, and unplug the sauna before cleaning or servicing.