
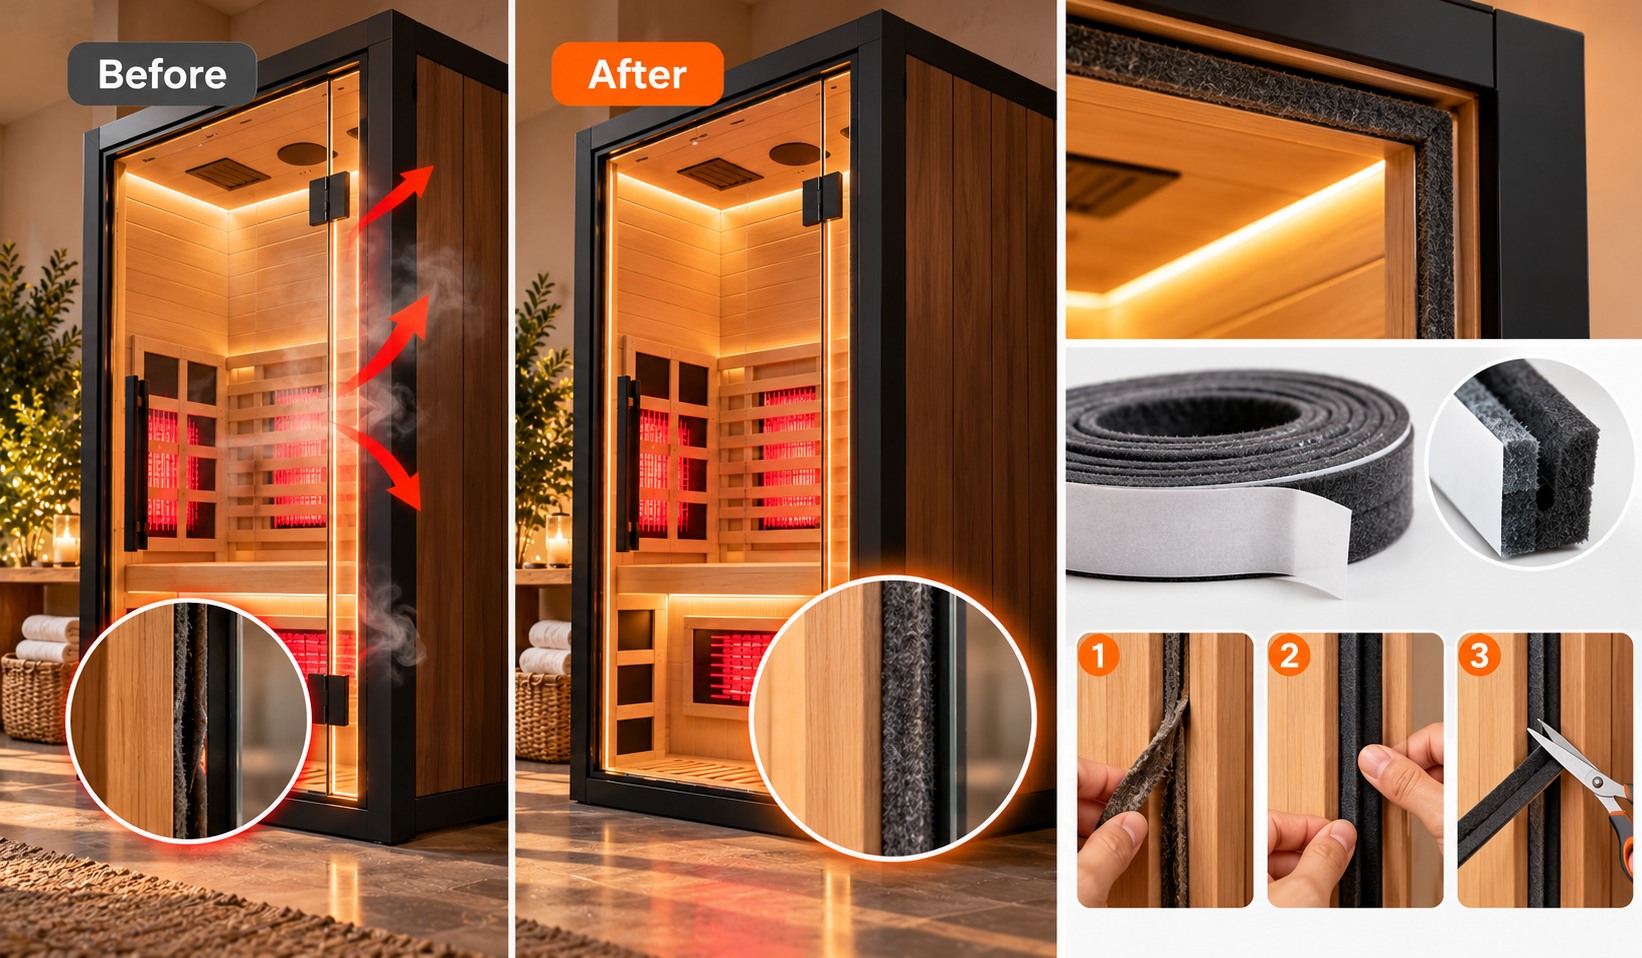
Fix Sauna Door Heat Loss: A Simple Seal Upgrade
If your home infrared sauna struggles to hold temperature or you feel a cold draft near the door, you are not alone. Many owners discover that the biggest energy leak is not the heater or the walls, but the thin strip of felt around the door. Upgrading that seal is one of the most effective, low-cost maintenance fixes you can do to keep your sessions comfortable and your energy bills in check.
Why Sauna Doors Lose Heat
Infrared saunas rely on a well-sealed cabin to trap the radiant heat produced by the heating panels. Even a small gap around the door allows warm air to escape and cool air to enter, which forces the heater to work harder and creates uneven temperatures inside. Over time, the factory-installed felt weather stripping can compress, wear down, or simply be too thin to compensate for minor irregularities in the wood frame or glass door.
This is a common issue across many home sauna models. The original felt is often a narrow strip that may not fully contact the door when the wood has slight bends or when the door is not perfectly aligned. The result is a temperature drop near the door seal, which you can feel with your hand or measure with an infrared thermometer.
How the Seal Affects Performance
The door seal acts as a thermal barrier. When it is intact and making full contact, it prevents convective heat loss and keeps the interior temperature stable. When it fails, you may notice that the area near the door is noticeably cooler than the rest of the sauna, and the heater may run longer to maintain your set temperature. This not only reduces comfort but also increases electricity consumption.
A simple test is to run your hand slowly along the door seam while the sauna is at operating temperature. If you feel even a faint draft, the seal is not doing its job. You can also use an infrared thermometer to compare the temperature near the door edge with the temperature in the center of the room. A difference of 10 degrees Fahrenheit or more suggests a significant leak.
Diagnosing Your Sauna Door Seal
Before you order replacement material, take a few minutes to inspect the existing seal. Open the door and look at the felt strip that runs along the frame or the door edge. Is it flattened, torn, or missing in places? Does it look uniform, or are there gaps where the wood is uneven? These are all signs that the seal needs attention.
Also check the door alignment. If the hinges are loose or the door has shifted, the seal may not make consistent contact even if the felt is in good condition. In that case, you may need to adjust the hinges before replacing the strip. Always refer to your owner manual for guidance on hinge adjustment, as forcing the door can damage the frame.
Tools and Materials You Will Need
For this project, you will need a few basic items: a roll of self-adhesive felt weather stripping (choose a thickness that is slightly greater than the original), a pair of scissors, a clean cloth, and optionally a plastic scraper or putty knife to help remove the old felt. Do not use metal tools that could scratch the wood or glass.
Make sure the sauna is turned off and completely cool before you begin. Work in a well-lit area so you can see the entire seal line. If you are replacing the seal on the door itself rather than the frame, you may want to remove the door from its hinges to make the job easier, but this is not always necessary.
Step-by-Step Seal Replacement
- Turn off and unplug the sauna, and allow it to cool completely.
- Open the door and locate the existing felt weather stripping. It is usually pressed into a groove or adhered to the wood.
- Starting at one corner, gently peel off the old felt. If it resists, use a plastic scraper to lift an edge, then pull it away slowly.
- Clean the surface where the new felt will go. Wipe away any dust, adhesive residue, or wood splinters with a dry cloth.
- Measure the length of the area to be sealed and cut the new felt to size, adding a small overlap if needed.
- Peel back a few inches of the protective backing from the new felt and press the exposed adhesive into the corner of the frame or door edge.
- Continue peeling and pressing the felt along the entire length, keeping it straight and firmly seated in the groove.
- Once the felt is in place, press along its entire length with your fingers to ensure good adhesion.
- Close the door and check for even contact. The felt should compress slightly and form a continuous seal.
- Turn the sauna back on and test the temperature near the door after about 30 minutes.
Why This Fix Works
The key to a good door seal is consistent contact. A thicker, more compressible felt can bridge small gaps caused by wood warping or minor misalignment. When the door closes, the felt compresses against the glass or wood, filling the space and blocking airflow. This simple change can reduce heat loss significantly and make your sauna feel warmer at lower power settings.
In one common scenario, an owner measured a 10-degree Celsius drop near the door corner before replacing the seal. After installing a thicker felt strip, the temperature remained much more uniform, and the cold draft disappeared. The improvement was immediate and required no special skills.
A well-sealed sauna door can reduce heat loss by up to 30 percent, depending on the size of the original gap. That means faster heat-up times, lower energy use, and a more consistent session.
Practical Safety Checklist
- Always disconnect power before working on any part of the sauna.
- Inspect the seal monthly for wear, compression, or gaps.
- Keep the door track and frame clean to prevent debris from interfering with the seal.
- If the door itself is warped or the hinges are damaged, consult a qualified technician rather than forcing the seal to compensate.
When to Call a Professional
Replacing weather stripping is a straightforward DIY task for most owners. However, if you notice that the door frame is cracked, the glass is loose, or the hinges are bent, do not attempt to repair those components yourself. Structural issues can compromise the safety of the sauna and should be addressed by a qualified technician. Similarly, any electrical work related to the heater or controls must be performed by a licensed electrician in accordance with local codes.
Always consult your owner manual before making any modifications. Some manufacturers have specific recommendations for seal material and installation, and using the wrong product could void your warranty. When in doubt, contact the manufacturer or a certified sauna service provider.
Video walkthrough: upgrading a sauna door seal on camera
YouTube: This Simple Door Seal Fixed My Sauna’s Heat Loss – on-camera door seal replacement
In this video, a sauna owner demonstrates the entire process of diagnosing and fixing a door seal that was causing noticeable heat loss. He starts by showing temperature readings with an infrared thermometer, revealing a 10-degree Celsius drop near the door corner. After confirming a draft along the seam, he removes the old, thin felt and replaces it with a thicker self-adhesive weather stripping. The video shows the step-by-step application, from peeling off the old material to pressing the new felt into place, and ends with a test that shows the door now makes full contact with the glass. The key takeaway is that a simple, inexpensive felt upgrade can dramatically improve heat retention and comfort.
Maintaining Your Sauna Door Seal Long-Term
Once you have installed a new seal, make it part of your regular maintenance routine. Check the felt every few months for signs of compression or wear, and replace it as soon as you notice gaps. Keep the door and frame clean, and avoid slamming the door, which can damage both the seal and the hinges. With proper care, a good quality felt seal can last for years.
Remember that the door seal is just one part of your sauna’s overall efficiency. Regularly inspect the heating panels, control panel, and ventilation openings as well. A well-maintained sauna not only performs better but also lasts longer and provides a safer, more enjoyable experience.
This article is for informational purposes only and does not constitute professional maintenance advice. Always follow the manufacturer’s instructions and consult a qualified technician for any repairs beyond simple seal replacement.
Frequently Asked Questions
1. How do I know if my sauna door seal needs replacing?
Run your hand along the door seam while the sauna is on. If you feel a draft, or if the temperature near the door is noticeably lower than the rest of the room, the seal is likely worn or too thin. You can also visually inspect the felt for flattening, tears, or gaps.
2. Can I use any type of weather stripping on my sauna door?
It is best to use a self-adhesive felt or high-temperature foam stripping designed for use in warm environments. Avoid rubber or vinyl strips that may off-gas or degrade at sauna temperatures. Check your owner manual for any specific material recommendations.
3. How often should I check the door seal?
Inspect the seal at least once a month, especially if you use the sauna frequently. Look for compression, peeling, or gaps, and replace the strip as soon as it no longer makes full contact with the door.
4. Is it safe to replace the seal myself?
Yes, replacing weather stripping is a simple DIY task that requires no special tools. Just make sure the sauna is turned off and cool before you start, and follow the steps carefully. If you are unsure, consult your owner manual or a professional.
5. What if the door itself is warped or misaligned?
If the door is warped or the hinges are loose, a thicker seal may help temporarily, but the underlying issue should be fixed. Adjust the hinges according to the manufacturer’s instructions, or contact a qualified technician for structural repairs.
6. Can a bad door seal affect my sauna’s energy use?
Yes. A leaky seal allows heat to escape, which forces the heater to run longer and use more electricity. Fixing the seal can reduce energy consumption and lower your operating costs.
7. How do I remove old adhesive from the door frame?
Use a plastic scraper or putty knife to gently lift the old felt and adhesive. Wipe the area with a dry cloth to remove any residue. Avoid using chemical solvents, as they can damage the wood finish.
8. What thickness of felt should I use?
Choose a felt that is slightly thicker than the original strip, but not so thick that the door becomes difficult to close. A thickness of 1/4 to 3/8 inch is often sufficient for most home saunas, but always refer to your owner manual.
9. Will replacing the seal void my sauna warranty?
In most cases, replacing a wear item like weather stripping will not void the warranty, but it is always best to check your warranty terms. Some manufacturers may require the use of specific replacement parts.
10. Can I use a hairdryer to help the adhesive stick better?
Applying gentle heat can help the adhesive bond, but be careful not to overheat the felt or the wood. A hairdryer on a low setting can be used to warm the surface before pressing the felt into place.
For more on low-EMF home infrared saunas and the models we offer, visit yardsauna.com.
This article is for informational purposes only and does not constitute professional maintenance advice. Always follow the manufacturer instructions, consult a licensed electrician or qualified technician for any electrical or structural work, and unplug the sauna before cleaning or servicing.