YardSauna Forest Assembly Tips: Step-by-Step Guide
Assembling a home infrared sauna can feel like a big project, but with the right approach, it is a manageable weekend task that pays off in years of relaxation. The YardSauna Forest 3-Person Infrared Sauna is designed for straightforward assembly using tongue-and-groove modular panels, and two adults can typically complete the build in 45 to 60 minutes. This guide walks you through the process step by step, with special attention to the large glass panels and the alignment of modular wall sections so you end up with a tight, secure fit.
Before You Start: Planning and Preparation
A little preparation goes a long way when assembling a sauna. The YardSauna Forest ships in multiple boxes, and while the parts are pre-cut and labeled, you will want to check everything before you begin. Lay out all components in a clean, open area and verify that you have all panels, hardware, and accessories. The sauna requires a dedicated 220V-240V circuit, so confirm that your electrical setup is ready before you start building. If you are not comfortable with electrical work, schedule a licensed electrician to handle the wiring after assembly.
Choose a location that is level, dry, and close to your electrical connection. The sauna measures 60 inches wide, 45 inches deep, and 75 inches high, so make sure you have enough clearance around all sides for air circulation and future maintenance. A solid, flat surface is essential; if your floor is uneven, use shims to level the base before adding wall panels. Keep the assembly area free of clutter and have a second person on hand to help lift and position the larger pieces.
Tools and Materials You Will Need
You do not need a full workshop to assemble the YardSauna Forest. Most of the parts snap together or use simple fasteners, but a few basic tools will make the job easier. Have a rubber mallet for gently tapping panels into place, a Phillips screwdriver for any screws, and a level to check alignment. A step stool or small ladder helps when working on the upper sections and roof. Keep a soft cloth or blanket nearby to protect the glass panels from scratches during handling.
- Rubber mallet (for tapping tongue-and-groove joints without damaging wood)
- Phillips screwdriver or cordless drill with a Phillips bit
- Level (2-foot or longer is best)
- Step stool or small ladder
- Soft cloth or moving blanket to protect glass panels
- Work gloves to protect your hands from splinters and sharp edges
Unpacking and Identifying Components
Open all boxes carefully and remove the packaging. The YardSauna Forest uses 100% non-toxic Canadian Hemlock, which is naturally durable and resistant to warping, but you still want to handle the panels with care. Check each panel for any damage that may have occurred during shipping. Look for cracks, chips, or warping, and contact customer support immediately if you find any issues. Most panels are labeled with a part number or letter that corresponds to the assembly instructions, so keep the manual handy.
Separate the hardware into small containers or bags so you do not lose screws or clips. The sauna includes a panoramic tempered glass front wall, which is one of the heaviest and most fragile pieces. Set the glass panel aside in a safe place, preferably still wrapped in its protective film, until you are ready to install it. The heating components, including the quartz full-spectrum heaters and ultra-low EMF carbon panels, are usually pre-installed in the wall or bench sections, so you will not need to wire them yourself.
Organizing the Modular Wall Sections
The YardSauna Forest uses a modular design with tongue-and-groove connections. Each wall section is a pre-assembled panel that locks into the adjacent panel. Before you start building, arrange the panels in the order they will be installed. The back wall, side walls, and front wall with the glass door are typically assembled in a specific sequence. Refer to the instruction manual for the exact order, as it can vary by model. Having everything laid out in order will speed up the process and reduce the chance of mistakes.
Pay attention to the orientation of each panel. The tongue (the protruding edge) should face the groove (the recessed edge) of the next panel. Some panels may have pre-drilled holes for screws or clips, so make sure those align correctly. If a panel seems to fit too tightly, do not force it; check that you have the right panel and that it is oriented correctly. A rubber mallet can help seat stubborn joints, but never hit the glass or any electrical components.
Step-by-Step Assembly Process
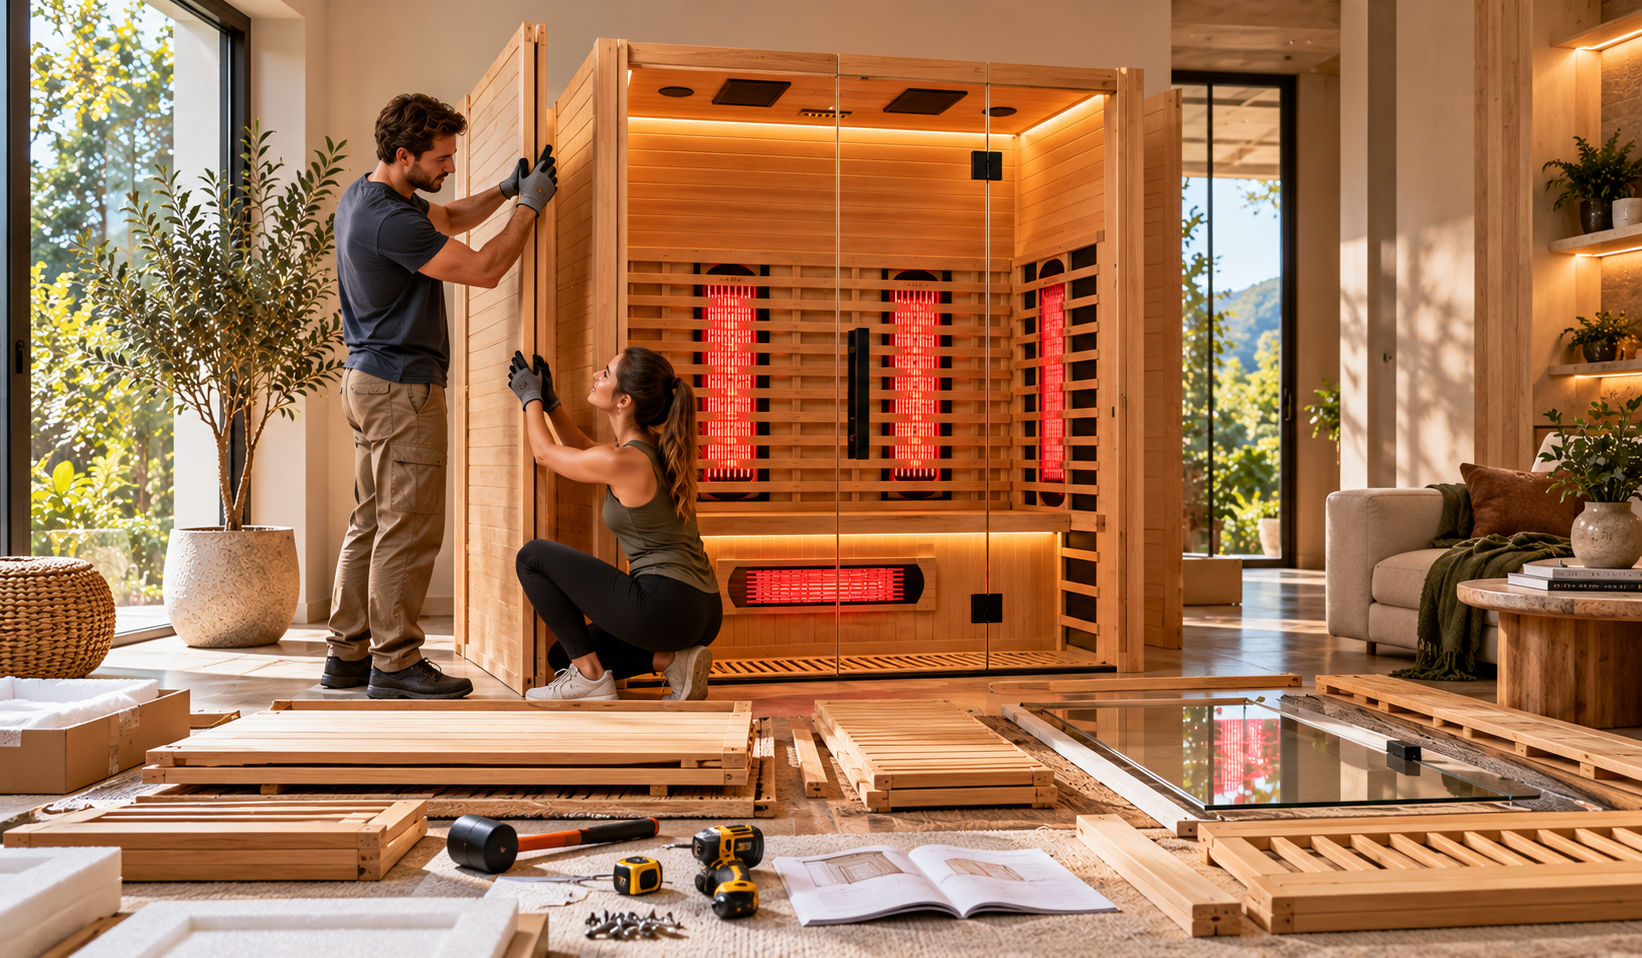
Follow these steps in order to assemble the YardSauna Forest correctly. Each step builds on the previous one, so take your time and double-check your work as you go. The entire process should take about an hour with two people, but allow extra time if this is your first sauna assembly.
- Position the floor panel. Place the floor panel on your prepared, level surface. Make sure it is square and level before proceeding. If your floor is slightly uneven, use shims under the panel to correct it.
- Attach the back wall panel. Lift the back wall panel into place on the floor panel. The back wall usually has pre-drilled holes that align with brackets or screws on the floor. Have one person hold the panel steady while the other secures it.
- Add the side wall panels. Attach the left and right side panels to the back wall. The tongue-and-groove edges should slide together smoothly. Use the rubber mallet to gently tap the panels into full contact. Check that the corners are square using a level or a carpenter’s square.
- Install the front wall with glass panel. This is the trickiest step. The front wall includes the panoramic tempered glass panel, which is heavy and fragile. Have both people lift the front wall into position and align it with the side panels. Do not let the glass touch the floor or any hard surface. Once aligned, secure the front wall to the side panels and floor.
- Place the roof panel. The roof panel fits on top of the four walls. It may have a groove that matches the top edges of the walls. Lift it carefully and set it in place. Check that all edges are flush and that there are no gaps. Some models include a small trim piece or screws to secure the roof.
- Install benches and heater panels. Inside the sauna, install the bench seats and any remaining heater panels according to the manual. The YardSauna Forest has a wide 60-inch bench that seats up to three adults, so make sure it is securely attached to the wall brackets.
- Connect electrical components. If the sauna has plug-and-play connections for the heaters and control console, connect them now. Otherwise, leave the electrical work to a licensed electrician. Do not plug the sauna into a standard 120V outlet; it requires a dedicated 220V-240V circuit.
- Final alignment and tightening. Go around the sauna and check all joints and fasteners. Tighten any loose screws and make sure the door opens and closes smoothly. Check that the glass panel is secure and that there are no gaps around the edges.
Handling the Large Glass Panels
The panoramic tempered glass front wall is a standout feature of the YardSauna Forest, but it requires careful handling. Tempered glass is strong, but it can shatter if it is hit on the edge or dropped. Always lift the glass panel with two people, one on each side. Keep the glass vertical and avoid twisting or bending it. Never set the glass panel directly on a hard floor; place it on a soft blanket or the original packaging.
When installing the glass panel, make sure the rubber gaskets or seals are in place. These seals prevent heat from escaping and protect the glass from vibration. If the seals are missing or damaged, the glass may rattle or the sauna may not heat efficiently. Check that the glass is centered in the frame and that the door latch operates smoothly. If the door does not close properly, adjust the hinges or the strike plate until it does.
Aligning Modular Wall Sections for a Secure Fit
The key to a secure sauna structure is proper alignment of the modular wall sections. Even a small misalignment can cause gaps that let heat escape or make the sauna unstable. Start by making sure the floor panel is perfectly level. Then, when you attach each wall panel, check that it is plumb (vertically straight) using a level. If a panel is leaning, adjust it before securing it.
Use the tongue-and-groove joints to your advantage. They are designed to pull the panels together tightly. If you see a gap between panels, gently tap the high side with a rubber mallet until the gap closes. Do not use excessive force, as this can damage the wood. Once the panels are aligned, secure them with the provided screws or clips. Do not overtighten, as this can strip the wood or crack the panel.
Common Mistakes to Avoid
Even with good instructions, mistakes happen. Here are some common pitfalls to watch out for during sauna assembly, and how to avoid them.
- Skipping the leveling step. An unlevel floor leads to misaligned walls and a crooked sauna. Always level the floor panel first, and check it again after adding walls.
- Forcing panels together. If a panel does not fit, do not force it. Check that you have the correct panel, that it is oriented correctly, and that no debris is blocking the joint. Forcing can crack the wood or break the tongue.
- Ignoring the electrical requirements. The YardSauna Forest needs a dedicated 220V-240V circuit. Plugging it into a standard outlet can damage the heaters or cause a fire. Hire a licensed electrician if you are not sure.
- Handling the glass panel alone. The tempered glass is heavy and awkward. Always use two people to lift and position it. One person can easily drop it or put too much stress on one corner.
- Overtightening screws. Over-tightening can strip the wood or crack the panels. Tighten screws until they are snug, then stop. If a screw feels loose, add a washer rather than cranking it down.
- Leaving gaps in the roof. A gap in the roof lets heat escape and reduces efficiency. Check the roof panel after installation and fill any gaps with the provided trim or sealant.
How the Modular Assembly Works
The YardSauna Forest uses a tongue-and-groove modular system that is common in modern sauna design. Each wall panel has a protruding tongue on one edge and a matching groove on the other. When you slide the tongue into the groove, the panels lock together, creating a strong, seamless joint. This design eliminates the need for complex framing or heavy tools, making assembly accessible to most homeowners.
The panels are made from Canadian Hemlock, a softwood that is lightweight yet sturdy. Hemlock is naturally resistant to warping and shrinking, which helps the joints stay tight over time. The panels are pre-finished and non-toxic, so there is no need for staining or sealing. The modular design also allows for easy disassembly if you ever need to move the sauna. Just reverse the assembly steps, and the panels come apart cleanly.
One of the benefits of this system is that it does not require nails or glue. The panels are held together by their own interlocking edges, plus a few screws or clips for added security. This means you can assemble the sauna without damaging the wood, and you can take it apart without leaving holes. The result is a clean, professional-looking structure that is as strong as a traditionally framed sauna.
Practical Tips for a Smooth Assembly
Here are some additional tips to make your sauna assembly go smoothly and ensure a long-lasting result.
- Read the manual completely before starting. Familiarize yourself with the parts list and the assembly order. This prevents surprises and saves time.
- Have a second person on hand. Many steps require two people, especially lifting the glass panel and the roof. Do not attempt to do it alone.
- Protect the floor. Place a drop cloth or cardboard under the assembly area to prevent scratches on your floor and the sauna panels.
- Check for square. Use a carpenter’s square at each corner to make sure the walls are at 90 degrees. Adjust before securing.
- Do not rush the electrical. If you are not comfortable with wiring, hire a professional. A faulty electrical connection is dangerous.
- Test the door before final tightening. Make sure the glass door opens and closes easily. If it binds, adjust the hinges before you finish.
- Keep the area clean. Sawdust or debris can get into the tongue-and-groove joints and prevent a tight fit. Wipe panels with a dry cloth before assembling.
- Allow the sauna to acclimate. If the sauna was stored in a cold garage, let the panels sit in the assembly room for a few hours to adjust to the temperature and humidity.
A level floor, a second set of hands, and patience with the glass panel are the three most important factors for a successful sauna assembly. Get those right, and the rest falls into place.
Buyer Considerations: What to Look for in a Home Sauna
When choosing a home infrared sauna, assembly ease is just one factor. You also want to consider the heating technology, materials, size, and electrical requirements. The YardSauna Forest stands out for its surround full-spectrum heating matrix, which combines high-output quartz heaters with ultra-low EMF carbon panels. This provides complete surround-body warmth, and the wide-format overhead red light and NIR array adds an extra layer of therapy across all three seating spots.
The sauna is built from 100% non-toxic Canadian Hemlock, which is a safe and durable material for indoor use. It is certified to UL, ETL, CE, and ISO 9001 standards, giving you confidence in its quality and safety. The extended tourmaline floor heater warms your feet, a feature that many users appreciate. The sauna also includes Bluetooth audio, a digital touch console, LED lighting, and multi-speed ventilation, making it a comfortable and convenient addition to any home.
Keep in mind that the YardSauna Forest requires a dedicated 220V-240V circuit, which is not standard in most US homes. You will need to hire a licensed electrician to install the proper outlet, which adds to the overall cost and timeline. However, the sauna itself is designed for easy assembly, and most homeowners can complete the build in under an hour with a helper. If you are looking for a spacious 3-person sauna with advanced heating features and a straightforward assembly process, the YardSauna Forest 3-Person Infrared Sauna is worth considering.
Video Walkthrough: Real-World Assembly Insights
Seeing a sauna assembly in action can clarify the process and highlight potential pitfalls. In this video walkthrough, a sauna owner shares his experience setting up a similar infrared sauna over three years ago. He discusses the delivery challenges, the step-by-step assembly, and the electrical setup, noting that the actual assembly took about two hours with straightforward instructions. He also points out a common issue with the roof gap and how he addressed it, as well as a heating problem caused by a temperature sensor that was too close to the heater. The video provides a candid look at what to expect, from unboxing to long-term maintenance.
The walkthrough emphasizes the importance of having help to move the heavy panels and the need for a dedicated electrical circuit. It also shows how the modular panels fit together without nails, relying on a belt system for stability. While the sauna in the video is not the YardSauna Forest, the assembly principles are similar, and the tips are directly applicable. Watching this before you start can save you time and prevent mistakes.
I Tried Costco's Sauna (3 Years Later) – Real owner assembly and maintenance walkthrough
Closing Summary: A Secure Fit for Years of Enjoyment
Assembling the YardSauna Forest 3-Person Infrared Sauna is a straightforward project when you follow the steps and take care with the glass panels and wall alignment. The tongue-and-groove modular design makes it possible for two adults to complete the build in about an hour, and the result is a sturdy, attractive sauna that fits seamlessly into your home. By leveling the floor, handling the tempered glass with two people, and checking each joint for a tight fit, you can avoid common mistakes and ensure your sauna heats efficiently for years to come.
The YardSauna Forest 3-Person Infrared Sauna offers a spacious interior, full-spectrum heating, and a panoramic glass front, all in a package that is designed for easy assembly. Whether you are a first-time sauna owner or upgrading from a smaller model, this sauna provides a solid foundation for your home wellness routine. Remember to consult the manual for specific details and always prioritize safety, especially when dealing with electrical connections. This guide is for informational purposes only.
Frequently Asked Questions
1. How long does it take to assemble the YardSauna Forest?
With two adults, the assembly typically takes 45 to 60 minutes. The modular tongue-and-groove panels are designed for quick installation. However, if you are new to sauna assembly or working alone, allow extra time. The electrical connection is separate and should be done by a licensed electrician.
2. Can I assemble the YardSauna Forest by myself?
It is not recommended. The large glass panel and roof section require two people to lift and position safely. Attempting to do it alone increases the risk of damage or injury. A second person also helps with aligning the wall panels and checking for square.
3. What tools do I need for assembly?
You will need a rubber mallet, a Phillips screwdriver or cordless drill, a level, and a step stool. A soft cloth or blanket is useful for protecting the glass panel. No specialized tools are required, and all hardware is included with the sauna.
4. How do I handle the tempered glass front panel safely?
Always use two people to lift the glass panel, one on each side. Keep the glass vertical and avoid twisting or bending it. Place it on a soft surface when not in use. When installing, make sure the rubber seals are in place to prevent rattling and heat loss.
5. What should I do if the wall panels do not fit together tightly?
First, check that you have the correct panels and that they are oriented correctly. Gently tap the high side with a rubber mallet to close any gaps. If the gap persists, check the floor for levelness and adjust with shims. Do not force the panels, as this can damage the tongue-and-groove edges.
6. Does the YardSauna Forest require a special electrical outlet?
Yes, it requires a dedicated 220V-240V circuit, not a standard 120V outlet. You will need a licensed electrician to install the proper wiring and outlet. Do not attempt to plug the sauna into a regular household outlet, as this can cause damage or a fire hazard.
7. Can I assemble the sauna on any type of flooring?
The sauna should be placed on a level, solid surface. Hardwood, tile, concrete, or low-pile carpet are all suitable, as long as the floor is even. If your floor is uneven, use shims under the floor panel to level it before adding walls. Avoid placing the sauna on thick carpet, which can compress and cause misalignment.
8. What is the best way to align the modular wall sections?
Start with a level floor panel. Then, as you attach each wall panel, use a level to check that it is plumb (vertically straight). Adjust before securing. Use the tongue-and-groove joints to pull panels together, and check corners with a carpenter’s square. Do not overtighten screws, as this can warp the panels.
9. How do I prevent gaps in the roof panel?
Make sure the roof panel is properly seated on all four walls. Check for any gaps and adjust the panel before securing. Some models include a trim piece or sealant to fill small gaps. A gap in the roof allows heat to escape and reduces the sauna’s efficiency.
10. Can I move the sauna after assembly?
Yes, the modular design allows for disassembly and reassembly. To move the sauna, reverse the assembly steps, carefully removing the roof, walls, and floor panel. Keep all hardware organized. Reassemble in the new location following the same steps. Moving the sauna without disassembling it is not recommended due to its size and weight.
11. What should I do if a panel is damaged during shipping?
Contact the manufacturer or retailer immediately. Take photos of the damage and keep all packaging. Most companies will replace damaged parts at no cost. Do not attempt to assemble the sauna with a damaged panel, as it may compromise the structure or heating efficiency.
12. Is the YardSauna Forest difficult to maintain after assembly?
Maintenance is minimal. Wipe down the interior with a damp cloth after use, and occasionally clean the glass with a mild glass cleaner. Check the door seals and hinges periodically. The Canadian Hemlock is naturally resistant to warping, so the structure should remain stable over time.
For more on low-EMF home infrared saunas and the models we offer, visit yardsauna.com.
This article is for informational purposes only and does not constitute medical advice. Always consult a qualified healthcare provider before starting any new wellness routine, especially if you have pre-existing conditions or are pregnant.