How to Install the YardSauna Forest 1-Person Infrared Sauna: A Step-by-Step Guide
Bringing an infrared sauna into your home is one of the most rewarding upgrades you can make for daily relaxation and recovery. The YardSauna Forest 1-Person Infrared Sauna is designed to make that process straightforward, even for first-time owners. This guide walks you through every step of the installation, from choosing the right spot to powering on your first session, so you can enjoy your new sauna with confidence.
Understanding the YardSauna Forest 1-Person Infrared Sauna
Before you start moving boxes, it helps to know exactly what you are working with. The YardSauna Forest 1-Person Infrared Sauna is a compact, freestanding unit that measures 36 inches wide by 36 inches deep by 75 inches high. That footprint is roughly the size of a small closet, which makes it a realistic option for bedrooms, home gyms, basements, or even a large bathroom. The sauna is built from natural Canadian Hemlock, a non-toxic softwood that resists warping and gives off a subtle, pleasant aroma when heated.
What sets this model apart is its full-spectrum heating system. It combines rapid-heating quartz elements with ultra-low EMF carbon panels, so you get both the immediate warmth of quartz and the deep, even penetration of carbon infrared. There is also a medical-grade overhead red light and near-infrared (NIR) therapy panel, plus a tourmaline-enriched floor foot heater. These features are already integrated into the panels, so you do not need to wire anything extra during installation. The sauna runs on a standard 120V / 15A dedicated household outlet, which means no special 240V circuit is required for most homes.
The assembly process is designed to be approachable. The sauna arrives as a set of tongue-and-groove modular panels that fit together without cutting or measuring. With two adults, the manufacturer estimates the full build takes about 45 to 60 minutes. That is a realistic timeframe if you have a clear workspace and follow the sequence carefully. The panels are labeled, and the hardware is organized, so you will not need a full toolbox—just basic hand tools like a screwdriver and a rubber mallet.
What is in the box
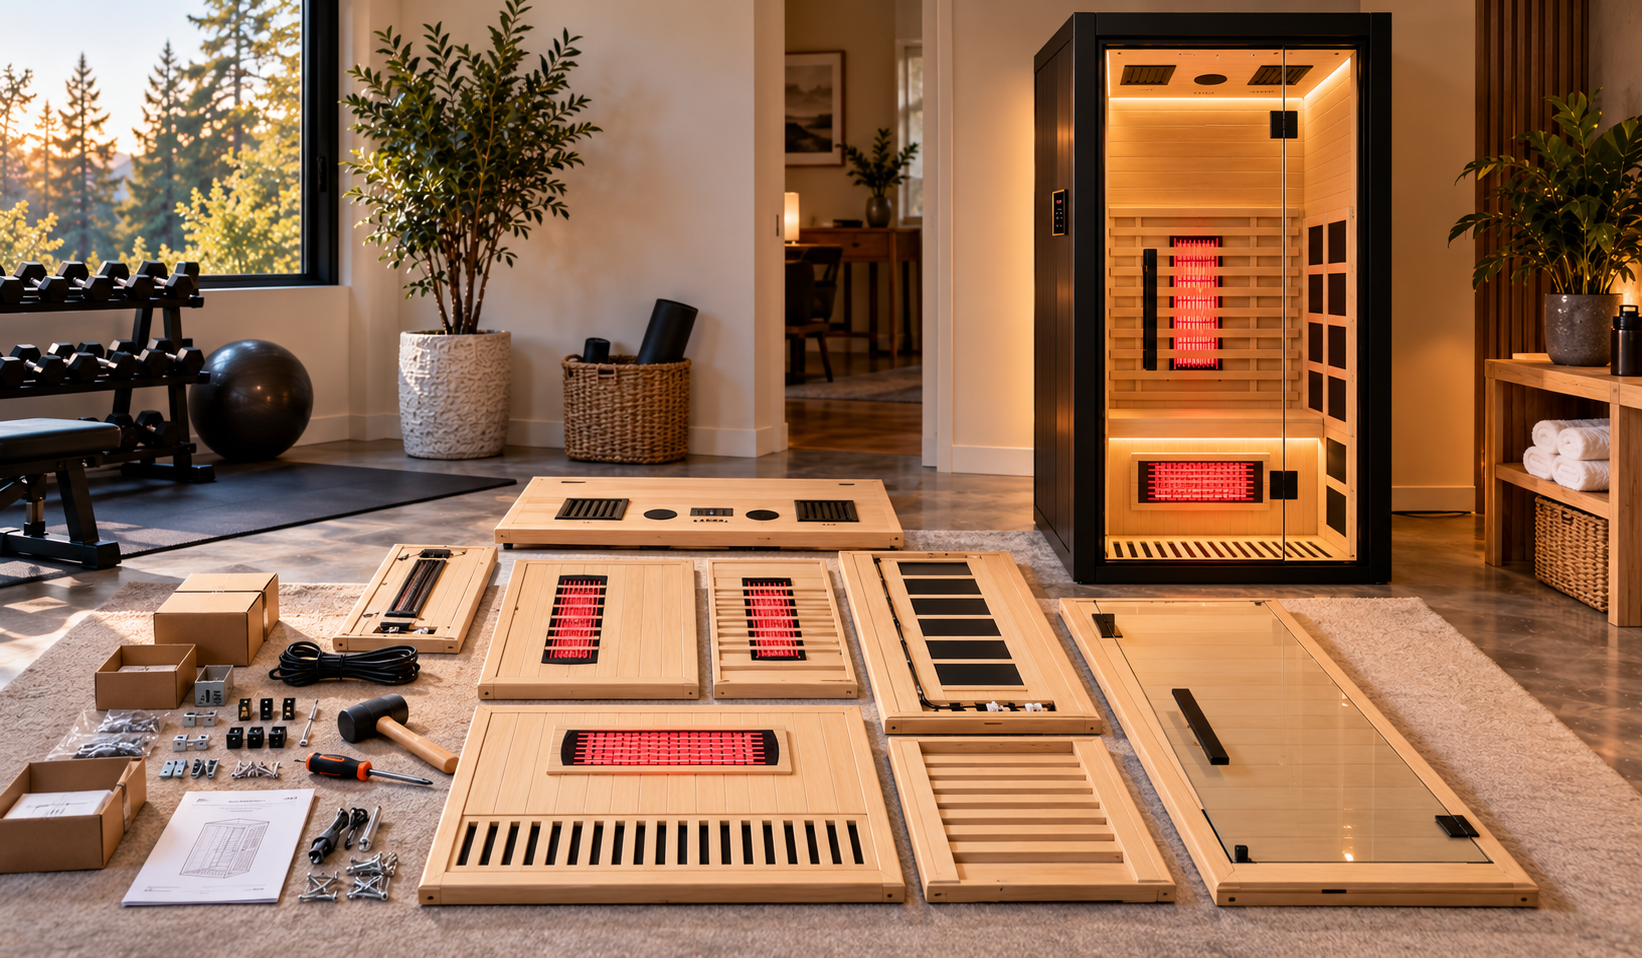
When your sauna is delivered, you will receive several large, flat-packed panels. The main components include the floor panel with the built-in foot heater, four wall panels, the roof panel with the red light and NIR panel, and the front panel with the tempered glass door. You will also find the digital touch controller, LED light strips, Bluetooth speaker module, ventilation grilles, and all the necessary screws, brackets, and connectors. A printed manual with diagrams is included, and it is worth reading through once before you start assembling.
Tools you will need
You do not need a workshop full of tools for this project. A Phillips head screwdriver, a rubber mallet, a level, and a step stool are usually enough. Some people find a cordless drill with a low-torque setting helpful for driving screws, but it is not required. You will also want a clean, flat surface to lay out the panels, and a soft blanket or cardboard to protect the wood finish while you work. Having a second person on hand is strongly recommended, not just for lifting but also for holding panels in place while you secure them.
Choosing the Right Location for Your Sauna
Location is the single most important decision you will make before the sauna arrives. The YardSauna Forest is an indoor sauna, so it needs to be placed in a dry, climate-controlled space. Basements, spare bedrooms, home gyms, and finished garages are all common choices. The key requirements are a level floor, access to a dedicated 120V outlet, and enough clearance around the unit for ventilation and comfortable entry.
You will want at least a few inches of clearance on all sides, especially behind the sauna where the main power cord and ventilation ports are located. The front of the sauna needs enough room for the glass door to swing open fully, which means about 24 to 30 inches of clear space in front. Also consider the ceiling height. At 75 inches tall, the sauna will fit under most standard 8-foot ceilings, but if you have a low basement ceiling, measure carefully before you commit to a spot.
Think about how you will use the sauna. If you plan to use it after workouts, placing it near your home gym makes sense. If you want to use it before bed, a bedroom corner might be ideal. The sauna does produce some warmth and a slight woody smell, so you may not want it in a small, poorly ventilated closet. A room with a window or an exhaust fan is a bonus, but the sauna itself has multi-speed ventilation to help manage air quality.
One thing to avoid is placing the sauna directly on carpet. The floor panel has a built-in foot heater, and while it is designed to be safe, a hard, flat surface like tile, laminate, or sealed concrete is easier to clean and provides a more stable base. If you must place it on carpet, use a rigid, non-slip mat underneath to prevent the sauna from shifting and to protect the carpet from heat and moisture.
Flooring and moisture considerations
Infrared saunas do not produce steam like traditional saunas, so moisture is less of a concern. However, you will still sweat during a session, and some of that moisture can drip onto the floor when you step out. A small, absorbent mat just outside the door is a simple solution. Inside the sauna, the floor panel is designed to handle normal use, but wiping it down after each session will keep the wood in good condition.
If you are placing the sauna in a basement, check for any signs of dampness or flooding. The sauna should never sit in standing water, and the electrical components need to stay dry. A dehumidifier in the room can help if your basement tends to be humid. The sauna itself is not rated for outdoor use, so keep it inside unless you have a fully enclosed, climate-controlled sunroom or similar space.
Electrical Requirements and Setup
The YardSauna Forest 1-Person Infrared Sauna is designed to plug into a standard 120V / 15A dedicated household outlet. That is the same type of outlet you would use for a microwave or a window air conditioner. The key word here is dedicated. A dedicated circuit means that nothing else is drawing power from that same circuit while the sauna is running. This prevents tripped breakers and ensures the sauna gets the consistent power it needs.
Before you buy the sauna, check your electrical panel. Most modern homes have plenty of 15-amp circuits, but older homes may have limited capacity or outdated wiring. If you are unsure, a licensed electrician can evaluate your panel and, if needed, install a dedicated outlet near your chosen sauna location. This is a relatively inexpensive job, usually taking less than an hour, and it gives you peace of mind.
The sauna comes with a standard three-prong plug and a power cord that is typically about six feet long. That means the outlet needs to be within reach of the sauna’s power inlet, which is usually located on the back or side panel. Do not use an extension cord. Extension cords can overheat and are not safe for a high-draw appliance like a sauna. If the outlet is not close enough, have an electrician add a new outlet rather than trying to stretch the cord.
Once the sauna is plugged in, the digital touch controller will light up and you can test the heating elements. The controller lets you set the temperature, adjust the session time, control the LED lighting, and pair your phone to the Bluetooth speakers. The sauna draws about 12 to 13 amps when all heaters are running at full power, which is within the safe range for a 15-amp circuit. However, if you have other devices on the same circuit, you may trip the breaker. That is why a dedicated circuit is so important.
Safety tips for electrical setup
Always plug the sauna directly into a grounded outlet. Never modify the plug or use an adapter that bypasses the ground pin. Keep the power cord away from high-traffic areas to prevent tripping, and do not run it under rugs or carpet where heat can build up. If you notice any flickering lights or a burning smell when the sauna is running, turn it off immediately and consult an electrician. These are rare issues, but they are worth taking seriously.
Step-by-Step Assembly Guide
Now for the main event: putting the sauna together. The process is straightforward, but taking your time and following the sequence will save you frustration. Here is a detailed walkthrough of the assembly, from unboxing to final tightening.
Step 1: Unpack and organize
Start by clearing a large, flat area near the final sauna location. Lay down a blanket or cardboard to protect the panels. Carefully remove each panel from the packaging and set them out in order. The panels are heavy, so lift with your legs and have your helper assist. Check the parts list against the manual to make sure nothing is missing. It is much easier to report a missing part before you start building than halfway through.
Step 2: Position the floor panel
Place the floor panel in the exact spot where the sauna will live. Use a level to check that it is flat. If the floor is slightly uneven, you can use thin shims under the low corners to level it out. The floor panel has the tourmaline foot heater built in, so handle it carefully and avoid dragging it across rough surfaces. Once it is in place, you can begin attaching the wall panels.
Step 3: Attach the back and side walls
Start with the back wall panel. It will have pre-drilled holes and a tongue-and-groove edge that fits into the floor panel. Have your helper hold the panel upright while you align the edges. Use the provided screws or connectors to secure it to the floor. Then attach one side wall, then the other. The tongue-and-groove joints should slide together snugly. If a joint feels tight, a gentle tap with a rubber mallet can help seat it, but do not force it.
Step 4: Install the front panel with the door
The front panel is the heaviest piece because it includes the tempered glass door. Lift it carefully and align it with the side walls. The door should swing open smoothly once the panel is secured. Check that the door latch lines up and that the glass is not binding. If the door does not close properly, the panel may be slightly out of square. Loosen the screws, adjust the panel, and re-tighten.
Step 5: Place the roof panel
The roof panel contains the overhead red light and NIR therapy panel, so it has electrical connectors that need to be plugged in before you set it in place. Follow the manual to connect the wiring harness from the roof panel to the controller. Then lift the roof onto the top of the walls. This step usually requires two people and a step stool. Once the roof is seated, secure it with the provided screws.
Step 6: Connect the electrical and test
Before you fully tighten every screw, plug the sauna into the wall outlet and turn on the controller. Test the heating elements, the red light panel, the LED lights, and the Bluetooth speakers. This is much easier to do now than after you have moved the sauna into a tight corner. If everything works, go ahead and tighten all the screws and check that all panels are flush.
Step 7: Final adjustments and cleanup
Once the sauna is assembled and tested, wipe down the interior with a soft, dry cloth to remove any dust from packaging. Check that the ventilation grilles are open and unobstructed. Place a small mat outside the door for stepping out. Then take a moment to read the user manual’s section on first use, which usually recommends a short preheat cycle to burn off any manufacturing residue.
Take your time during assembly. Rushing through the panel connections can lead to misaligned joints and a door that does not close properly. A slow, methodical build takes an hour and gives you a sauna that feels solid and well-made for years.
Common Mistakes to Avoid During Installation
Even with a well-designed kit, there are a few pitfalls that can trip up first-time sauna owners. Knowing what to watch for will help your installation go smoothly and prevent damage to the sauna or your home.
1. Skipping the dedicated circuit
This is the most common mistake. Plugging the sauna into a shared circuit with other appliances can cause the breaker to trip mid-session, which is frustrating and can shorten the life of the heating elements. Always use a dedicated 120V / 15A outlet. If you are not sure whether your outlet is dedicated, check your breaker panel or ask an electrician.
2. Placing the sauna on an uneven floor
An uneven floor can cause the panels to twist, which puts stress on the joints and can make the door stick. Use a level before you start and shim the floor panel if needed. A stable base is essential for the sauna to function properly and for the door to seal correctly.
3. Forcing the tongue-and-groove joints
The panels are designed to fit together snugly, but if you have to use significant force, something is misaligned. Stop and check that the panels are square and that no debris is caught in the groove. Forcing a joint can crack the wood or strip the screw holes.
4. Ignoring clearance requirements
The sauna needs airflow around it to dissipate heat and to allow the ventilation system to work. Pushing the sauna flush against a wall or into a tight corner can trap heat and reduce the lifespan of the electronics. Leave at least a few inches of clearance on all sides, and more in front for the door.
5. Using an extension cord
Extension cords are not rated for continuous high-amperage loads. They can overheat and create a fire hazard. If your outlet is too far from the sauna, have an electrician install a new outlet. It is a small investment compared to the cost of replacing a damaged sauna or dealing with a house fire.
6. Assembling alone
While it is possible to assemble the sauna by yourself, it is much harder and increases the risk of dropping a panel or straining your back. The roof panel, in particular, is awkward to lift alone. Recruit a friend or family member for the hour or so it takes to build. You will both enjoy the first sauna session more.
How the YardSauna Forest Heating System Works
Understanding how your sauna produces heat will help you use it more effectively and appreciate the engineering behind it. The YardSauna Forest uses a full-spectrum infrared heating system, which means it emits infrared energy across a range of wavelengths. This is different from a traditional sauna, which heats the air around you. Infrared saunas heat your body directly, which allows for a lower ambient temperature while still producing a deep, satisfying sweat.
The heating system has three main components. First, there are the rapid-heating quartz elements. These are located in the wall panels and produce near-infrared and mid-infrared energy. Quartz heaters warm up quickly, so you feel the heat within minutes of turning on the sauna. They also produce a pleasant, glowing warmth that many people find more comfortable than the dry heat of a traditional sauna.
Second, there are the ultra-low EMF carbon panels. These panels emit far-infrared energy, which penetrates deeper into the body than near-infrared. Far-infrared is the wavelength most associated with the classic infrared sauna experience—gentle, even heat that warms you from the inside out. The carbon panels in the YardSauna Forest are designed to emit very low levels of electromagnetic fields, which is a concern for some sauna users. The exact EMF levels are not published, but the panels are certified to be ultra-low EMF, which means they are well below typical safety thresholds.
Third, there is the medical-grade overhead red light and NIR therapy panel. This panel uses specific wavelengths of red and near-infrared light, which are different from the heating elements. Red light therapy is often used for skin health and cellular recovery, though the sauna is not a medical device and no health claims are made. The panel is integrated into the roof, so it shines down on you while you sit. It can be controlled separately from the main heaters, so you can use it on its own if you prefer.
Finally, the tourmaline-enriched floor foot heater provides warmth from below. Tourmaline is a mineral that is often used in far-infrared products because it is believed to emit negative ions and far-infrared energy when heated. In the YardSauna Forest, the floor heater ensures that your feet stay warm, which helps maintain even heat distribution throughout the sauna. This is a nice touch, because cold feet are a common complaint in smaller saunas.
All of these components are controlled by the digital touch controller. You can set the temperature, typically up to around 140 degrees Fahrenheit, and the session time, usually up to 60 minutes. The controller also manages the LED lighting, the Bluetooth speakers, and the ventilation fan. The ventilation system has multiple speeds, so you can adjust the airflow to your comfort. This is important because the sauna is a small, enclosed space, and good ventilation prevents the air from feeling stale.
Practical Tips for a Smooth Installation
Here are a few extra tips that will make your installation day easier and help you get the most out of your new sauna.
- Read the manual cover to cover before you start. It has diagrams that clarify the assembly sequence and wiring connections.
- Lay out all the hardware in small bowls or cups so you do not lose screws or connectors.
- Use a cordless drill with a clutch set to low torque to avoid stripping the wood screws.
- Have a level and a rubber mallet within reach at all times.
- Do a dry fit of the wall panels before screwing anything in to make sure the orientation is correct.
- Recruit a helper who is patient and detail-oriented—assembly is more about alignment than strength.
- Plan for a short preheat cycle after assembly to burn off any residue from manufacturing and packaging.
- Keep the sauna unplugged when you are not using it if you want to save energy, though many owners leave it plugged in for convenience.
Buyer Considerations: Is the YardSauna Forest Right for You?
Before you commit to the YardSauna Forest, it is worth thinking about whether this specific model fits your needs. The most obvious consideration is size. At 36 inches by 36 inches, this is a one-person sauna, and it is designed for a single seated occupant. If you are tall, you may find the interior a bit snug, though the 75-inch height gives you enough headroom to sit comfortably. If you want to share the sauna with a partner or friend, you will need a larger model, but for solo use, this footprint is hard to beat.
The electrical requirements are another factor. The 120V / 15A plug is a huge advantage because it means you do not need to run a 240V circuit or hire an electrician for a major upgrade. Most homes already have a suitable outlet, though you may need to dedicate a circuit. This makes the YardSauna Forest one of the easiest saunas to install in a typical American home.
The full-spectrum heating system is a differentiator. Many budget infrared saunas use only carbon panels, which are effective but slower to heat. The combination of quartz and carbon in the YardSauna Forest gives you both quick warm-up and deep penetration. The overhead red light and NIR panel is a bonus that not all saunas in this price range include. If you are interested in red light therapy as part of your sauna routine, this model has it built in.
Finally, consider the materials and build quality. The Canadian Hemlock is a solid, non-toxic wood that is commonly used in saunas because it is lightweight, stable, and has a pleasant scent. The tempered glass front gives the sauna a modern look and makes the interior feel less claustrophobic. The certifications (UL, ETL, CE, ISO 9001) are a good sign that the sauna has been tested for safety and quality. These are all factors that contribute to the overall value of the unit.
Real-World Installation Examples
To give you a better sense of what installation looks like in practice, here are a few scenarios based on common home layouts.
Basement home gym: A homeowner in Ohio placed the YardSauna Forest in the corner of a finished basement next to a treadmill. The floor was vinyl plank over concrete, which provided a stable, level base. The nearest outlet was on a shared circuit, so they had an electrician add a dedicated 15A outlet on the wall behind the sauna. Assembly took about 50 minutes with two people. The sauna fit easily under the 8-foot ceiling, and the ventilation fan kept the basement from feeling stuffy during use.
Spare bedroom: A couple in Texas converted a small guest bedroom into a wellness room. They placed the sauna against an interior wall, leaving about 18 inches of clearance on each side. The room had a standard 15A outlet that was not shared with any other appliances, so no electrical work was needed. They used a small area rug under the sauna to protect the hardwood floor and a mat outside the door. The sauna’s compact size left plenty of room for a yoga mat and a small bench.
Large bathroom: A homeowner in California installed the sauna in a master bathroom that had extra space near the shower. The bathroom had tile flooring, which was ideal. The outlet was a GFCI-protected circuit, which is safe for use in a bathroom. They were careful to keep the sauna away from the shower spray and used the exhaust fan to manage humidity. The sauna’s Bluetooth speakers were a nice touch for listening to music or podcasts during sessions.
These examples show that the YardSauna Forest is flexible enough to work in a variety of settings, as long as you pay attention to the basics: a level floor, a dedicated outlet, and enough clearance for airflow and door swing.
Final Setup and First Use
Once your sauna is assembled and plugged in, there are a few final steps to prepare it for regular use. First, wipe down the interior with a damp cloth to remove any dust from assembly. Then run the sauna empty at a moderate temperature for about 30 to 45 minutes. This preheat cycle helps burn off any residual oils or odors from the manufacturing process. You may notice a slight smell during this first run, which is normal and will fade quickly.
While the sauna is preheating, take a moment to familiarize yourself with the digital touch controller. Set the temperature to your preferred level—many infrared sauna users start around 110 to 120 degrees Fahrenheit and work up from there. Set the session timer for 15 to 20 minutes for your first few sessions. You can adjust the LED lighting to a soft color, pair your phone to the Bluetooth speakers, and set the ventilation fan to a comfortable speed.
When you are ready for your first session, hydrate before you enter. Bring a towel to sit on, as the bench can get warm. Start with a shorter session and listen to your body. Infrared saunas are generally well tolerated, but it is important to ease into a routine. After your session, wipe down the bench and floor with a dry cloth, and leave the door open for a few minutes to let the interior air out.
With proper installation and care, the YardSauna Forest 1-Person Infrared Sauna can provide years of daily relaxation and recovery. The assembly process is straightforward, the electrical setup is simple, and the compact size makes it a practical addition to almost any home. Whether you are a sauna novice or a seasoned enthusiast, this model offers a balanced combination of performance, safety, and convenience.
Frequently Asked Questions
1. Can I install the YardSauna Forest on a second floor?
Yes, the sauna is lightweight enough for most residential floors. The total weight is manageable for two people to carry, and the footprint is small. However, check that your floor is level and can support the weight without flexing. If you have any doubts, consult a structural engineer or place the sauna near a load-bearing wall.
2. Do I need a special outlet for the sauna?
The sauna requires a standard 120V / 15A dedicated household outlet. It is the same type of outlet used for most small appliances. The key is that nothing else should be on the same circuit while the sauna is running. If your outlet is shared, have an electrician install a dedicated circuit.
3. How long does assembly really take?
With two adults and all tools ready, assembly typically takes 45 to 60 minutes. The panels are pre-cut and labeled, so there is no measuring or cutting. First-time builders may take a bit longer, especially if they are being careful with alignment. Plan for about two hours total, including unpacking and cleanup.
4. Can I use the sauna outdoors?
No, the YardSauna Forest is designed for indoor use only. It is not weatherproof and should not be exposed to rain, snow, or extreme temperatures. If you want an outdoor sauna, you will need a model specifically built for outdoor conditions.
5. Does the sauna need ventilation?
The sauna has built-in multi-speed ventilation fans that help circulate air during use. You do not need to install additional ductwork. However, the room where the sauna is placed should have some natural airflow, such as a window or an HVAC vent, to prevent the space from feeling stuffy.
6. What is the EMF level of the heating panels?
The carbon panels are certified as ultra-low EMF, meaning they emit very low electromagnetic fields. The exact measurements are not published, but the certification indicates they are well within safe limits. If you are concerned about EMF, you can sit farther from the wall panels or use the sauna at lower temperatures.
7. Can I assemble the sauna by myself?
It is possible but not recommended. The roof panel and front door panel are heavy and awkward to handle alone. Having a second person reduces the risk of injury and makes it much easier to align the tongue-and-groove joints. Most people find the process goes faster and more smoothly with help.
8. How do I clean the sauna after installation?
Use a soft, damp cloth to wipe down the interior wood surfaces. Avoid harsh chemicals or abrasive cleaners, as they can damage the wood. For the glass door, a mild glass cleaner is fine. After each session, wipe up any sweat with a dry towel and leave the door open for a few minutes to air out.
9. What temperature should I set for my first session?
Start low, around 110 to 120 degrees Fahrenheit, and keep your first session to 15 to 20 minutes. This allows your body to acclimate to the infrared heat. You can gradually increase the temperature and duration as you become more comfortable. Always listen to your body and hydrate before and after.
10. Is the sauna safe for use in a bathroom?
Yes, as long as the outlet is GFCI-protected and the sauna is kept away from direct water spray. The sauna is an electrical appliance, so it should not be placed in a shower or where it could get wet. A large bathroom with good ventilation is a suitable location.
11. Does the sauna require any maintenance after installation?
Very little. The wood does not need to be oiled or sealed. You should periodically check that the screws are tight and that the door hinges are lubricated if they start to squeak. Wipe down the interior after each use and keep the ventilation grilles free of dust.
12. Can I move the sauna after it is assembled?
It is possible but not easy. The sauna is heavy and the panels are connected, so moving it requires lifting the entire unit. If you need to relocate it, it is best to disassemble it partially or use furniture sliders and at least two strong people. Plan the location carefully before you build.
The information in this article is for informational purposes only. Always follow the manufacturer’s instructions and consult a licensed electrician for any electrical work.
For more on low-EMF home infrared saunas and the models we offer, visit yardsauna.com.
This article is for informational purposes only and does not constitute medical advice. Always consult a qualified healthcare provider before starting any new wellness routine, especially if you have pre-existing conditions or are pregnant.